Software as a Service
Welcome to the Automated Infrastructure Deployment Tool!
Did you ever wonder how to obtain a working, multi-user analysis environment for your students or your group?
This page will guide you step by step in the setup of a JupyterHub hosted on a Cloud instance, and will provide an overview of few notebooks solutions, to implement both standalone or in combination with JupyterHub.
Here you have an advanced tool that allows anyone to deploy his/her own JupyterHub.
Why anyone? Because no particular skills are required, it is sufficient to have a basic knowledge of the linux bash terminal, and access to a cloud provider onto which host the whole infrastructure.
Features
Now, let's dive into the fundamental features of the tool:
(if you don't care about the theory, just jump to the dashboard and start deploying!)
- Notebooks flexibility: your JupyterHub will not be bound to a specific notebook. We do provide a standard notebook, but if you have your own notebook image available on a registry, you can effortlessly deploy it. This allows both great customizability, and the possibility to exploit JupyterHub for different analyses (not only ALTAS Open Data, but also ML applications, etc..)
- Persistency of data: your work will not be lost at the end of the session, neither you will have a timeout for your notebooks. Data, plots and results are always saved and accessible.
- External/shared volumes: if you have a big dataset, it is crucial to be able to share it with the users without having each of them to download the data.
- Speed: this infrastructure is fast: the deploy time of the whole environment is of the order of 10 minutes (it only happens once); once JupyterHub is up and running, users will be able to obtain their notebook in a matter of seconds.
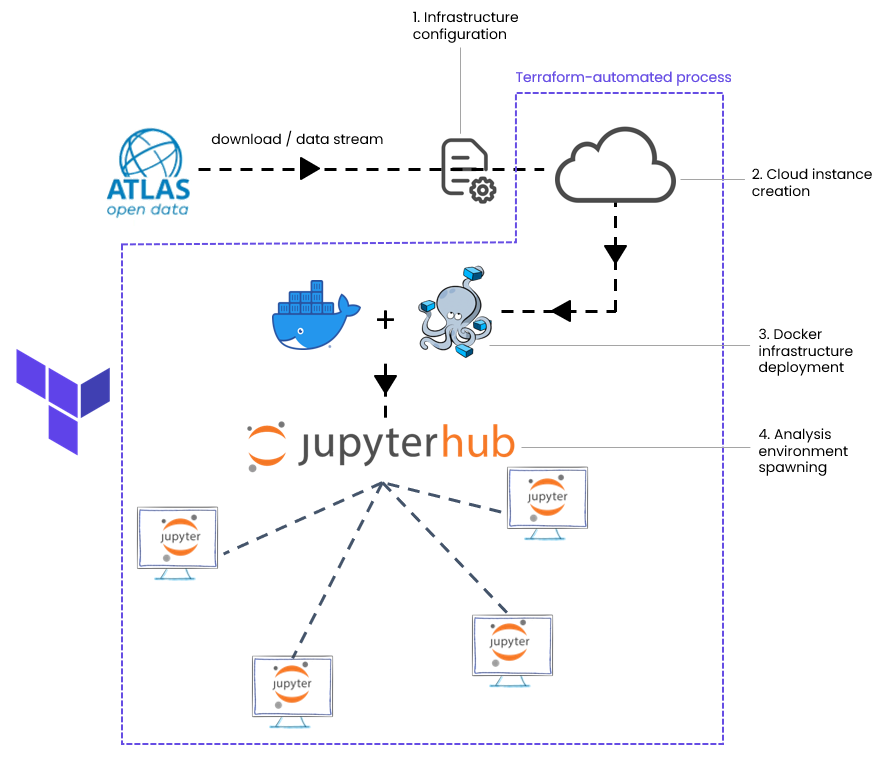
Workflow
The deployment process relies on two fundamental services: Docker and Terraform.
Docker provides the modular layout of the infrastructure, enabling most of the above-mentioned features; together with agility and flexibility, thanks to the containerization, Docker also provides lightness to the whole environment. On the other hand, Terraform ensures the automation of the JupyterHub deployment. Below it is shown a flowchart of the deployment process.
Single user solutions
Container images for Jupyter notebooks
Jupyter notebooks are the core of the analysis effort of ATLAS Open Data.
Here we present a notebook built on top of the latest scipy version, in which we embed the installation of the ROOT framework used at CERN, available in both python and C++ kernels. Other versions of the notebook are in development, in order to gradually increase the analysis potential of this tool.
You can run the notebook both standalone or in combination with the JupyterHub infrastructure descripted above. Try it out on your pc by simply running the following docker command:
docker run -it --rm -p8888:8888 atlasopendata/root_notebook:latest
Then access the notebook via the browser by pasting the url provided by the terminal. It should be something like (The token will be different for you)
To access the notebook, open this file in a browser:
        file:///home/jovyan/.local/share/jupyter/runtime/nbserver-15-open.html
    Or copy and paste one of these URLs:
        http://4c61742ed77c:8888/?token=34b7f124f6783e047e796fea8061c3fca708a062a902c2f9
     or http://127.0.0.1:8888/?token=34b7f124f6783e047e796fea8061c3fca708a062a902c2f9
Virtual Machine(s)
ATLAS Open Data also provides a virtual machine, which allows you to test the 13 TeV ATLAS Open Data on your own host machine.
Take a closer look to our resources:
Container git repositories | Container Registry | Virtual Machine |
|---|---|---|
 |  |  |
Deployment dashboard
Just select the cloud provider that tickles your fancy (i.e. of which you actually have a working account), and follow the instructions!
AWS instance | OpenStack@CERN instance | Google Cloud instance |
|---|---|---|
 |
WARNING: we are experiencing an issue that prevents Openstack instances to correctly install conda packages. We are investigating on the possible causes.
Local deployment
If you wish to try the infrastructure out without having to use a cloud provider, no problem! Just follow these instructions and deploy JupyterHub on your pc. You will be able to explore the environment and experience all the features that come with it!
Further readings
If you are interested in knowing more about the technical details of this deployment tool, please take a look at:
- The openstack-deployer gitlab repository
- The AWS-deployer gitlab repository
- The CI notebook images gitlab repository
Disclaimer
The code and the recipes are licensed under the European Union Public Licence.
The datasets are provided by the ATLAS Collaboration only for educational purposes and is not suited for scientific publications.
- The ATLAS Open Data are released under the Creative Commons CC0 waiver.
- Neither ATLAS nor CERN endorses any works produced using these data, which is intended only for educational use.
- All data sets will have a unique DOI that you are requested to cite in any (non-scientific) applications or publications.
- Despite being processed, the high-level primary datasets remain complex, and selection criteria need to be applied in order to analyse them, requiring some understanding of particle physics and detector functioning.
- The large majority of the data cannot be viewed in simple data tables for spreadsheet-based analyses.